Tuesday, April 16, 2013

Yes, you can make your own soap

Thanks for stopping by!  For the most recent content, you can find me at A Housewife Writes.

Lately I keep running into people who want to learn how to make their own soap.  Soapmaking can be an art form, most definitely, but it should also be a basic skill.  After all, up until the last hundred years or so, nearly all housewives knew how to make the soap for their families' needs.  Even though I make soap and sell it, I would like to see more people making their own.  There's nothing quite as nice as making your own anything.  So, R, I, and T--this tutorial is for you!  (And for you, too.)

This is my version of a fruit/veggie wash soap, using just olive and coconut oils, based on this recipe from the Soap Queen blog.  It's a mild, unscented soap, and very simple to make.  It's mild enough to use as a hand soap, as well.

Here are the very basic supplies you'll need--


I love this mold from Bramble Berry, but it's not an absolute necessity.  For the first several years of soaping, my primary molds were Rubbermaid plastic divider trays and a cardboard box that once carried cups of yogurt.  (Just line your molds with freezer paper, shiny side up.)

Lye

Lye is absolutely essential to making soap--it can't be made without it.  How else can you get oils and water to blend together and harden into a bar?  Lye (sodium hydroxide) can be dangerous stuff, but with a dose of caution, it shouldn't scare you away from making soap.  Take bleach, for example.  You most likely have a bottle of it in your house, but you keep it away from children, avoid the fumes, don't use it on your bare skin and use it strictly according to the directions.  Use the same precautions with lye.  Just wear safety glasses and gloves and wear socks and long sleeves on the off chance the lye mixture happens to splash.  You can also cover the counters with newspaper to make cleanup easier.

You can find lye at many hardware stores, in the plumbing aisle.  Make sure it's 100% sodium hydroxide; for the record, Draino is not. 
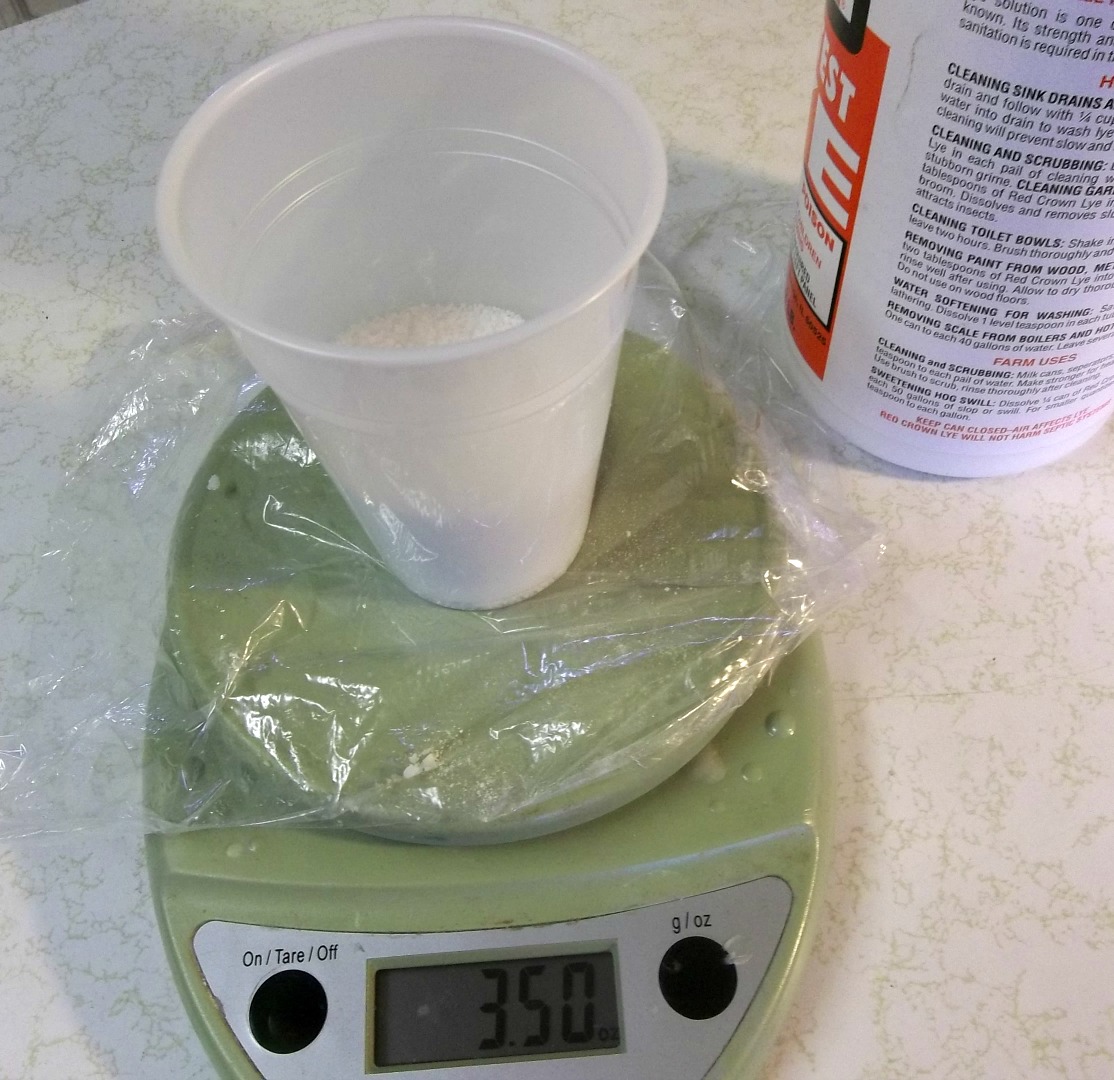
Measure as carefully as you can.  You'll definitely want a scale, so you don't have soap that won't harden or the other extreme, soap that will strip the first layer of skin right off....or at least feel like it!

The Recipe

14 oz. coconut oil
8 oz. olive oil
3.5 oz. sodium hydroxide
8 oz. distilled water

Weigh out the oils, either altogether into the pan or separately before adding to the pan.  Melt the oils over lowest heat.  I use a stovetop but some use a microwave.  I turn off the heat before all the coconut oil is melted and let the few remaining chunks melt on their own.  You want the oils melted, not hot.


Measure the water into a stainless steel or plastic bowl (don't use glass or aluminum.)  You'll notice that as you slowly sprinkle in the lye and stir to dissolve, the mixture heats up.  I usually set the bowl in a sink containing a few inches of cold water so the lye mixture won't get too hot and will cool down more quickly.   Stir carefully so you don't splash and make sure every lye crystal is dissolved.

The lye heating up the water
All lye is dissolved.
When the outside of the bowl is room temperature or slightly warm (not hot) to the touch, you are ready to mix with the oil.  Carefully pour the lye mixture into the melted oils and stir it with a stick blender.  You can also use a whisk, but it will take longer to thicken.


You will eventually notice that the mixture thickens and no longer separates.  When you can drizzle a stream of soap across the surface and it doesn't sink back into the mixture, it has reached trace.   It's now ready to pour into the mold.

See the drizzle across the top?
Pour into a mold and just leave to sit on a counter until it hardens.  I usually let it sit overnight (12 hours or so).  You will be able to tell if it's too soft to cut.  After it's cut/unmolded, I set the bars on pieces of plastic canvas to dry and cure for 4 agonizingly long weeks.  After that, you can keep a bar next to your sink and use it to wash all your produce (and of course, impress everyone with your new skill.) 


This is just a basic overview and if you find that you enjoy making your own soap, there are many sites to help you learn more about the science of soaping and how to make your own recipes with scents and colors.  Here is a great place to start and one of my favorite resources.


And that's it!  You have a way to clean your produce--it's inexpensive, you know all the ingredients and you made it yourself!  It's not so hard, huh? 


Friday, March 29, 2013

Cut back on sugar week--Almond Crunch Candy

Honey is such a tricky sweetener.  It is a liquid and a humectant, meaning it helps to attract and maintain moisture, so it gives a different, not always so desirable quality, to baked goods.  It browns faster and darker and cookies made with honey are soft instead of crispy.  But in candy it's a different tale.  I should have called it "honey week" because as I look over the posts, honey's been the only sweetener I've used.

I found this recipe for Almond Crunch Candy several years ago in my 1978 Rodale's Naturally Delicious Desserts and Snacks cookbook.  It's one of my favorites from the book.

Melt 1/3 c. butter and 1/4 c. honey in a skillet.

Chop 3/4 c. almonds and add to the mixture in the pan. 
Cook over medium heat and keep stirring for about 7-9 minutes, or until mixture turns golden brown.  The picture above was taken early in the process--it's fairly pale colored.  When it begins to brown, pour it quickly into an 8x8 pan and cut right away into 36 itty-bitty pieces (cut 6 by 6).  They may seem small, but you'll find that it's a good size.  If you cooked it to just the right temperature, it'll cool to a crunchy, toffee-like texture, if it was slightly underdone, they'll be more of a caramel texture.  It will be hard to be disappointed, either way.

Lunch is served!


or the snack size serving...


Almond Crunch Candy

1/3 c. butter
1/4 c. honey
3/4 c. slivered almonds

Butter an 8x8 square pan. 

Melt butter in heavy frying pan; stir in honey.  Add almonds.  Cook over medium heat, stirring constantly until mixture turns golden brown (about 7 minutes--judge by the color more than the time).

Spread mixture in prepared pan, working quickly, while still very hot.  With buttered, sharp knife, cut into squares immediately.  Cool. 

Chill in refrigerator and store in covered container. 

Yields 36 pieces. 

So there you go. Five ways to eat sweets without touching that bag of white sugar.  I'll have to do another series of these sometime!

Thursday, March 28, 2013

Cut back on sugar week--Applesauce leather

This treat is a new for me; actually it was a successful experiment just this week.  I'm sure I'm not the first person to think of it, though.

I've made fruit roll-ups (fruit leather) before, but only with fresh grape puree.  As you can imagine, those are long gone and have been since, oh, 12 hours after I made them last fall.  Last week I happened to look at the jar of home-canned applesauce in the refrigerator and wondered if I could dehydrate it like my grape "sauce."  I'm not suffering from a shortage of applesauce so I thought I'd give it a try.

I don't have any of those dehydrator trays made just for drippy sauces and since I hadn't thought ahead to borrow them, I thought I'd try parchment paper instead and cut them to roughly fit the tray.


I mixed applesauce with some cinnamon using the dump-til-it-looks-good method:

I spread about 3/4 of a cup of applesauce on the paper.  I wasn't sure if the applesauce might become permanently stuck to the paper, so I sprayed one piece of parchment paper with olive oil. 

A few hours later it was dry to the touch.  It didn't take nearly as long as I thought it would. 

The apple leather on the ungreased parchment paper peeled easily from the paper and the leather on the greased paper separated from the paper as it dried, so it's not necessary to add the olive oil.  That was really good news.  I'm so glad that I don't have to buy those plastic dehydrator trays now!


Talk about simple.  Unsweetened applesauce with a little cinnamon.  And it's so easy--cutting parchment paper into circles is the longest part of the process.  But it makes applesauce a little more interesting and conveniently packable--nice for traveling!

Wednesday, March 27, 2013

Cut back on sugar week--Granola Bars

These are Captain Awesome's favorite--yummy and portable.  We packed them hiking to Acadia National Park a few years ago and snacked on them all week. 

I like them best with chocolate or carob chips, but....refer to the title of this post.  Sigh...

2/3 c. butter
2/3 c. honey
4 1/2 c. rolled oats
1 c. flour
1 t. baking soda
1 t. vanilla
up to 2 c. chocolate chips, raisins, nuts, and/or dried fruit

Combine all in a big mixing bowl.  The main trick with these is to press the mixture firmly into the pan.  (If you don't get it pressed in firmly, save the crumbles for topping for pudding or something like that.) Bake at 350 degrees for 20 minutes or until golden in a greased 13x9 pan.  Makes 36.

Mixing it up can get a little messy....

My peanut/raisin version.  They're pretty good, even without chocolate.

Shared on Simple Lives Thursday.

Tuesday, March 26, 2013

Cut back on sugar week--Fudge Stars

Thanks for stopping by!  For the most recent content, you can find me at A Housewife Writes.

I adapted this recipe from a post on the Passionate Homemaking blog.  Oh, do I love these little candies, if you want to call them that.  Pure cocoa and raw honey with all their nutrients and coconut oil with the saturated fat we need--eat it for medicinal purposes, if nothing else.  Sweets made with honey are more satisfying than those made with sugar, so even just a few of these make a nice dessert.  Who needs sugar with these around?!

Fudge Stars

1/2 c. cocoa powder (I substitute 1 T. or so of carob powder for even more nutrition)
1/2 c. coconut oil (the unrefined kind, that tastes like coconut)
1/4-1//3 c. raw honey

Mix together (I recommend a food processor or blender to make it smooth).  It's not necessary to melt the coconut oil.

When blended, it has the consistency of frosting.  Spoon it into a piping bag or decorating tube.  Lick the spoon and processor bowl thoroughly.  Don't get your tongue caught in the blade.

Use a tip with a jagged top like this one, that makes stars.

Pipe stars onto parchment paper and set them in the freezer to harden.  And that's it!  Keep them in the freezer since coconut oil melts at 76 degrees.  This recipe makes 60+ stars.

Monday, March 25, 2013

Cut back on sugar week- Fruit Tapioca

Good ol' sugar--we all love it.  I just read over the weekend that it's nearly as addictive as cocaine.  Before you scoff at that, think of the last day you went without any.  Or the last meal that contained no sugar, for that matter.  It makes me wonder if it's a little more addictive than we'd like to think. 

For awhile there, I was doing pretty well.  I was cooking with minimal white sugar and instead, using unrefined sugar cane, honey, and molasses and eating fewer sweets, period.  I found that I felt SO much better with less sugar.  But somehow I fell off the wagon without realizing it--a birthday, a sale on ice cream, and some dessert experiments in the kitchen didn't help.

And then a few days ago, a friend of mine and I were talking about sugar and she asked how I managed to cut back.  "Easy," I said between mouthfuls of an ice cream sandwich, "it's just a matter of pacing yourself."  (No, really, I wasn't eating an ice cream sandwich while I was on the phone.  It's important to focus on one thing at a time.)  But Captain Awesome and I decided that starting Monday, we were going to renew our efforts to cut back on the sugar.

Just cutting out sweets altogether is not the way to go.  At least, not for a cheery home.  So for the next five days I'll be sharing some of the non-white sugar recipes that I'll be making this week and in the future to get us back on track.  I realize that fruit and honey are both sugars, but we must start somewhere, however small.

Today's recipe is Fruit Tapioca, adapted from my 1950 Betty Crocker's Picture Cook Book.  I make this regularly and it's a nice simple dessert.  I freeze fruit like raspberries, cherries, and strawberries in 1 pint boxes during the summer. 

When I thaw it, I let the juice drain into a measuring cup.  Here is a pint of thawed cherries draining.  I only had about 1/2 c. of cherry juice, so I added grape juice to make up the 2 1/2 cups of liquid.  

To the juice I added tapioca.  NOTE:  Check carefully to ensure that you grabbed the bag labeled "tapioca" and not the bag labeled "pretzel salt."  They may look amazingly similar, but as you stir it, you'll notice the "tapioca" disappearing and you'll become so confused that you'll taste it.  Then you'll wish you hadn't.

Then the honey...

Bring the mixture to a boil, add the chopped fruit and chill.


Fruit Tapioca

Mix in a saucepan:

2 1/2 c. fruit juice, with tea or water added as needed to make the full amount
1/3 c. honey
1/4 c. quick cooking tapioca
1/8 t. salt

Cook over low heat, stirring constantly until mixture boils.  Remove from heat.  Cool and fold in

1 c. drained, cut-up fruit.

Mix and match the fruit and juice--I've never had a disaster!

Linked to Natural Living Monday, Traditional Tuesday, Simple Lives Thursday, and Old Fashioned Friday.

Thursday, March 21, 2013

Cuisine a la can

In my perusal of mid-20th century cookbooks, I've noticed the recipes contain a stunning array of canned foods.  It is my guess that when the modern convenience craze began rolling in a big way and homes were being filled with "labor-saving devices," food manufacturers jumped at the occasion with a little too much enthusiasm.  (The very fact that food could be considered "manufactured" should have given someone a glaring clue...)

I suppose housewives, enthralled by the idea of spending an extra hour at Mildred's bridge party, thought they could come home, open a few cans and ta-da!  Dinner!  This sort of cuisine delighted no one ever and thankfully, some of these tinned wonders died along the way as manufacturers stopped canning everything they could squeeze into a cylinder.


If you had been cooking in the 1950s, take a look at these oh, so convenient canned wonders you could have chosen for your main dish (and all these are really found in the "Jiffy Cooking" section of the 1958 Mary Margaret McBride Encyclopedia of Cooking):

lamb stew
beef and kidneys
tongue and tongue loaf
chicken fricassee
chicken a la king
codfish cakes
Welsh rabbit

For side dishes, there were
canned cooked rice
canned tomato aspic
canned dandelion greens

And for dessert, how about some canned fig pudding?

And don't forget potted meat, the particular "delicacy" which is still easily found in stores and, I confess, my cupboard.  Yes, really.  Not everyone has such a thoughtful sister-in-law who will clean out the potted meat shelf at the local scratch-n-dent store and present it to you for your birthday and dare you to find a way to prepare it.


As I walked past the freezer section at the grocery store today, I saw frozen single serve tubs of oatmeal, pre-made for breakfast (sure to entice you out of bed in the morning).  A few shelves away were packages of frozen mashed potatoes.  And then there's the pre-cooked, vacuum packed bacon, non-refrigerated dairy products and a vast number of other foods preserved and packaged for maximum storage time at the expense of taste and nutritional quality.

We've come a long way.

I can still hope that these technological wonders we have accepted as food will one day be as unappetizing as the early canned experiments as we re-learn the old ways of preparing and storing food.

photo source

This post linked to Simple Lives Thursday.